Carefully open the packaging and start removing all the pieces. Nintendo Switch Console - Neon with improved battery, Samsung 43In UE43TU7020KXXU Smart 4K UHD HDR LED TV, Bush VCS35B15KD Bagless Cylinder Vacuum Cleaner, Keeping your fridge freezer cool in the heat, E-Scooters: Easy fixes for running issues, Click here to view the instruction manual. Make sure the washer rings are still around the screws. There are three places to fix the shed to the floor as you can see here. Before moving onto Step 4- you can take a moment to first prepare all the CO Screws by sliding a Washer ring, labeled WA, around each one, which provides insulation. Position TD2 with the lip facing the outside and click it into place. Then use a rake or shovel to level the surface. You will need parts labeled TD2 and 2 CO screws. Expensive but great bit of kit These classic Cedarwood saunas are made from Reading Handyman assembled this amazing custom made table and 8 chairs last week. Slide one along the first wall panel and click into flooring. Its constructed out of a sturdy and weather-resistant resin that features steel reinforcement for added durability and features an attractive wood-like texture for great style. These go in the available holes in the floor panel, at the door entry. Ideal for storing garden tools, equipment, furniture and sundries, and using as a potting shed. Click part DH1 in and secure using two screws. All that is left to do now is to assemble the accessories, your windows and shelf. Next stage is to assemble the roof. Start by clicking part A4 and A2 together and finish by snapping a BC part on top at the peak. So identify them when sorting. IF THERE ARE MISSING OR BROKEN PARTS, PLEASE DO NOT RETURN THE PRODUCT TO THE STORE.Please log onto our website, or contact Customer Service at: SIL Y A DES PICES MANQUANTES OU CASSES, NE RETOURNEZ PAS LE PRODUIT AU MAGASIN.Veuillez visiter notre site Internet, ou contacter notre Service Clientle: SI HUBIERA ALGUNA PARTE FALTANTE O DAADA, NO DEVUELVA EL PRODUCTO A LA TIENDA.Inicie sesin en nuestro sitio en Internet o contctese con nuestro servicio de atencin al cliente: BITTE BRINGEN SIE IHR PRODUKT NICHT GLEICH ZUM LADEN ZURCK, FALLS TEILE FEHLEN ODER DEFEKT SIND.Bitte loggen Sie in unsere Website ein oder wenden Sie sich an unseren Kundenservice: IN GEVAL VAN ONTBREKENDE OF GEBROKEN ONDERDELEN NIET HET PRODUCT NAAR DE WINKEL RETOURNEREN.Ga naar onze website of neem contact op met de Klantenservice: IN CASO DI PARTI MANCANTI O DANNEGGIATE, EVITARE DI RESTITUIRE IL PRODOTTO AL NEGOZIO.Accedere al nostro sito o contattare il Servizio Clienti: SE HOUVER PEAS EM FALTA OU PARTIDAS, NO DEVOLVA O PRODUTO LOJA.Entre na nossa pgina de Internet ou contacte o Servio de Clientes: Thank you for your purchase of the Keter shed, In order to activate your warranty, please enter www.keter.com, and ll in the form under warranty activation. Return to any Argos store within 30 days for an exchange or full refund. Make sure they are all securely locked into place. For the best experience on our site, be sure to turn on Javascript in your browser. Wall panels are pre-built so you wont need to construct them.  It is paramount that the shed is put on a levelled solid base. First of all you will need to put together the floor, which will provide a level surface and a base for your shed. Clear the area of stones and remove all plants, roots and other obstacles. Step 6, to join wall panels together you will need Support Beams labeled CS. Place it directly in the center of the gable beams and click into place. They will prevent your doors from swinging. A rotating hasp door closure is included to keep your possessions secure, This shed is supplied flat packed with comprehensive fitting instructions and fixings provided - 2 people are required to build this shed, We recommend that sheds are sited on pre-laid, level, solid and dry ground, with a foundation of either a wooden shed base, concrete or paving to give a stable and even footing for your shed to sit on, Integral skylight for added internal illumination, Pre-marked locations to screw building into a fixed location on concrete (floor screws not included), The dimensions given refer to the external dimensions of the product unless otherwise stated, Comes with a 15 year manufacturer guarantee. Then place window frame F-IN on the inside and fix together using 7 screws around the edge. Copyright 2022 Cheap Sheds Intemational Pty Ltd All Rights Reserved. Make sure these are completely clicked into place with no gaps. This is one of those "simple" jobs that required a lot planning and dealing with the manufacturer. In this video we will be assembling the Apex 8x6 Keter Resin Shed. Now repeat process for step 7 to 11 until all your wall panels are securely clicked in place and you have the shell of your shed. It is recommended that you construct a wooden or concrete base to use as a foundation. This is the instruction manual for the KETER 8X6 PLASTIC FACTOR APEX SHED DO. Clearlight sauna installed in Sonning. For easy identification of the parts, code letters are imprinted on them. Very generous landlordsThey asked their tenants what furniture they want and bought everything online and Rebo Odyssey Wooden Swing Set with Platform and Slide assembled in Caversham, Reading. You may need your ladder for this one. The factor 8 x 6 shed is ventilated and comes with a heavy-duty floor panel, making it ideal for storing a wide variety of heavy items, wide double doors for easy accessibility and a ceiling high enough to allow an adult to move around freely. Two sets of hands will make it much faster, easier and safer. Be aware there is a top and bottom end of these sheets. Now click in the DLA door locks. At the bottom center of the front beam, which is directly above the door click in the AP, join where a hole is provided.
  Unfold the roof sheeting and slide them on and press them firmly into place. Using parts RS pieces in the kit screw these to the roof frame. Be careful of the door pegs and make sure it clicks in securely without forcing it. Before you unpack you will need to make sure you have the following tools on hand: Safety gogglesGlovesPower DrillLevelerScrewdriverHammerLadder. You can either do this step as you go, like the instructions outline or wait till you have finished the shell as we have done in this video. Web Design by, Previous: Swimming pool maintenance in Reading, Next: Premium TV stand flat pack assembly, Custom Made Table And Chairs Assembled in Early, Reading, Professional oak wallbars: modified, assembled and installed, Rebo Odyssey Wooden Swing Set with Platform and Slide assembled in Caversham, Office furniture assembly in Central Reading, Decking area washed and painted + external garden walls and some cladding in T, Pic and mirror hanging job in The Warren, Caversham, 20 years old shed refelted and given a new lease of life, 2 beautiful art pieces hanged in Baughurst, https://www.youtube.com/watch?v=TPF-biPVYBY&t=13s. Use the CO screws to fix it on the inside to panel O. Next we are securing the hasps. To secure its position, use the screws SC9 to fix it from underneath. Next you will need to fix the frame labeled DNS along the side of the left door using 8 screws. One has the window cut out and the other doesnt. US: # 1-888-374-4262Canada: # 1-800-661-6721UK: # 0121-5060008Other European Countries:# 31-1612-28301. 4 office tables and 12 office chairs assembled for one of our commercial Reading Handyman Services 2009 - 2020. Again check you have not lost the washer rings on the screws. Download a FREE QR-Code reader from your smartphone application site. The totalshed assembly time is around 4h for one person. Wall panels slide easily into the provided groove in wall panel O. Sometimes you may need to gently knock parts into place till they click. Lastly click the hinges labeled DX to the outside edge of both doors. ASSEMBLY INSTRUCTIONS | CONSIGNES DE MONTAGE | INSTRUCCIONES DE MONTAJE | MONTAGEANLEITUNG | MONTAGE-VOORSCHRIF TEN | ISTRUZIONI DASSEMBL AGGIO | INSTRUES DE MONTAGEM. Some parts have steel edges so be careful when handling components, Always wear work gloves, eye protection and long sleeves when assemblingor performing any maintenance on your shed. First insert the 2 steel slats into the resin shelf parts. You will now need 12 SC1 screws to fix the floor panels together. Place the first beam on the front wall of the shed. Therefore unless in a sheltered place, they will blow away in high winds if left empty so make sure you fill it up with some heavy objects if you dont want to find your shed in yourneighbours garden one day after a storm. Reading Handyman also assembles flatpack furniture, sheds, trampolines, play houses, sports equipment and more. There are 2 for each shelf, this will give them stability. Your shed parts are all in the 2 packages you have received. Do not attempt assembly on days with strong winds or low temperatures. The factor 8x6 shed is a storage solution that fits into any space. Your kit comes with the necessary window parts and at this stage you have already installed the wall panels with the window cut outs. Before unpacking your kit, it is recommended to use a clean work surface to spread the parts out and for pre-assembly. A property owner has already demolished his old shed and createda fairly flat base for this new shed. Also note while good torque electric screwdriver/power drill is not strictly required, its pretty much essential because you will have to drive a lot (~100) of various screws, many without pre-drilled holes Preparing them all now will prevent you from loosing the washers. All Rights Reserved. These items will ensure your assembly is smooth and easy, so be sure to check you have the right equipment before starting. Now we need to fix them to the shed walls carefully. First your DP Beams should be clicked on along the top and bottom of the door panels and the pegs labeled HG need to be added to the corners at the top and bottom. Before the roof goes on, you need to add the Skylight panel labeled BM. 1. Now for the roof finishing touches. Remember to Stop and Check your manual regularly so you know you are on the right track. Make sure to use your safety gloves, edges may be sharp. When hanging your doors make sure to click them in place at a 90 degree angle- so place the bottom joint in the hole and move to click the middle hinge in place against the wall and finish by standing it up straight. For the best experience on our site, be sure to turn on Javascript in your browser. Well get your shed assembled in no time. These Keter Apex sheds are only tested at wind speeds of up to 47mph. Screw all 12 RS pieces down. Next, place the windowpane gently into the frame.
  Read through all instructions before you begin and continue to refer to them during the entire assembly process. If you need help with shed & furniture assembly then contact your local handyman today. On the door to the left you will find a narrow slot in the edge by the handles. They can either be installed on the back wall of your shed or on either of the sidewalls. Then fix it from the inside with two CO screws. Side window can be installed on any side. Now we are going to assemble the doors.
 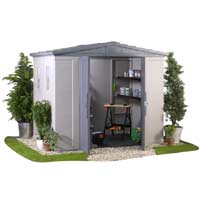 You will need 4 SC12 screws, 2 handles labeled GM, and two parts labeled GLL and GLR, which are both slightly different. In Step 4 you need to position a wall panel labeled O on one of the corners of the floor kit. In this particular case, the client wanted it to be on the right-hand side. If your base is not levelled you will not be able to interlock all the side panels properly. This Keter Apex 86 plastic shed was recently assembled by Reading Handyman in Caversham, Reading. Hope you enjoyed the project and if you have any questions please do not hesitate to visit CheapSheds.com.au. Repeat these steps for the second window. Grab the F-Out Window frame and slide it into place like so. Paving stones can be used instead of a solid concrete base. You will also find grooves in the floor for the wall to click into. Shelves can only be installed in the side walls and as you can see you have two options for your shelf. Walls are either labeled SPK or SP. If you are thinking of buying this shed then you should know a few things about it. These are marked MT2. Please prepare these components in advance at the beginning of each stage. Lastly screw the 4 corners of the roof from the inside. Fix the wall panel to the floor by screwing in the CO screws into the available holes.
  Argos Limited 2022. Lastly you will need to attach the side roof beams along the top of the left and right walls. Now, when unpacking and building your shed please be aware that. As you can see the roof has a slight overhang so to ensure it is securely fixed to the shed use 12 screws along each side but not the corners. To complete the Shed itself you need to simply screwing 2 SC12 screws to the bottom center left hand wall and the right, to secure the support beams in the center. Your shed comes with double doors so there should be parts for both. All Rights Reserved.
  This Factor 8x6 apex Resin & steel shed is ideal for storing garden tools, equipment, furniture and sundries, and using as a potting shed. You will also need 4 GSA shoulder washers. Before doing this make sure its facing the right way round and right side up. The first has the window cut out so before starting, its a good time to decide where you want your windows to go. The quality is surprisingly good, base interlocks together and its fairly easy to assemble. JavaScript seems to be disabled in your browser. Repeat for the door on the right however fix part GLR to the front with the handle. Before you start building your shed, make sure you have a nice level surface for your shed. You will also need an extra person to help build the shed. And click in the doorstoppers labeled DS. 20122022, manualsdir.comAll rights reserved. As you can see here. These just click into the available slots at the top and bottom of the left door. Click here to view the instruction manual. Make sure it is securely clicked onto the wall by pressing it gently into the grooves. Along the roof sheeting you will find 6 cut out sections. Next step is to set up the wall panels- you can use either wall panels labeled SP or SPK at this stage. We are now going to build the shell of the shed, by adding the walls. He stored all of his tools and equipmentin a popup gazebo next to it to keep them safe before the new shed arrives and is assembled. Now that your windows are complete we can move onto the Shelf- this too is very easy. You will need a stepladder to ensure you do this properly and safely. We recommend that sheds are sited on pre-laid, level, solid and dry ground, with a foundation of either a wooden shed base, concrete or paving to give a stable and even footing for your shed to sit on. Repeat process by fixing part DH2 on the right hand side door using 2 screws, the same way you did part DH1. The shed walls already provide a support lip around the edge so all you need to do it click parts SN to the middle beam, rest your shelf on the lip and secure them with a screw. Now slide in the 2 support beams either side of the skylight. Then add floor panels FS on either end to complete it. Set preferred store for Click + Collect and more. If you do decide to assemble it on your own there will be a point where you will need someoneshelp for 5 minutes just to hold the roof panels down whilst you secure them from the inside everything else can be done by one person. Now to put the finishing touches to the roof frame, all you need to do is click in place parts labeled DUC to the inner side beams in the center and click part CA to the back wall roof beam. You can either use a screwdriver or a powered drill to get the job done. This was an early morning Office furniture assembly in Central Reading. Next is to screw in the front and back beams to the roof sheeting underneath from the inside. Line up the 2 floor, panels labeled FG together and click them together. Next we are going to attach the door handles and security features. First you will need to attach door handle GILL to the left door using 2 screws and 2 GSA shoulder washers on the back.
It is paramount that the shed is put on a levelled solid base. First of all you will need to put together the floor, which will provide a level surface and a base for your shed. Clear the area of stones and remove all plants, roots and other obstacles. Step 6, to join wall panels together you will need Support Beams labeled CS. Place it directly in the center of the gable beams and click into place. They will prevent your doors from swinging. A rotating hasp door closure is included to keep your possessions secure, This shed is supplied flat packed with comprehensive fitting instructions and fixings provided - 2 people are required to build this shed, We recommend that sheds are sited on pre-laid, level, solid and dry ground, with a foundation of either a wooden shed base, concrete or paving to give a stable and even footing for your shed to sit on, Integral skylight for added internal illumination, Pre-marked locations to screw building into a fixed location on concrete (floor screws not included), The dimensions given refer to the external dimensions of the product unless otherwise stated, Comes with a 15 year manufacturer guarantee. Then place window frame F-IN on the inside and fix together using 7 screws around the edge. Copyright 2022 Cheap Sheds Intemational Pty Ltd All Rights Reserved. Make sure these are completely clicked into place with no gaps. This is one of those "simple" jobs that required a lot planning and dealing with the manufacturer. In this video we will be assembling the Apex 8x6 Keter Resin Shed. Now repeat process for step 7 to 11 until all your wall panels are securely clicked in place and you have the shell of your shed. It is recommended that you construct a wooden or concrete base to use as a foundation. This is the instruction manual for the KETER 8X6 PLASTIC FACTOR APEX SHED DO. Clearlight sauna installed in Sonning. For easy identification of the parts, code letters are imprinted on them. Very generous landlordsThey asked their tenants what furniture they want and bought everything online and Rebo Odyssey Wooden Swing Set with Platform and Slide assembled in Caversham, Reading. You may need your ladder for this one. The factor 8 x 6 shed is ventilated and comes with a heavy-duty floor panel, making it ideal for storing a wide variety of heavy items, wide double doors for easy accessibility and a ceiling high enough to allow an adult to move around freely. Two sets of hands will make it much faster, easier and safer. Be aware there is a top and bottom end of these sheets. Now click in the DLA door locks. At the bottom center of the front beam, which is directly above the door click in the AP, join where a hole is provided. Unfold the roof sheeting and slide them on and press them firmly into place. Using parts RS pieces in the kit screw these to the roof frame. Be careful of the door pegs and make sure it clicks in securely without forcing it. Before you unpack you will need to make sure you have the following tools on hand: Safety gogglesGlovesPower DrillLevelerScrewdriverHammerLadder. You can either do this step as you go, like the instructions outline or wait till you have finished the shell as we have done in this video. Web Design by, Previous: Swimming pool maintenance in Reading, Next: Premium TV stand flat pack assembly, Custom Made Table And Chairs Assembled in Early, Reading, Professional oak wallbars: modified, assembled and installed, Rebo Odyssey Wooden Swing Set with Platform and Slide assembled in Caversham, Office furniture assembly in Central Reading, Decking area washed and painted + external garden walls and some cladding in T, Pic and mirror hanging job in The Warren, Caversham, 20 years old shed refelted and given a new lease of life, 2 beautiful art pieces hanged in Baughurst, https://www.youtube.com/watch?v=TPF-biPVYBY&t=13s. Use the CO screws to fix it on the inside to panel O. Next we are securing the hasps. To secure its position, use the screws SC9 to fix it from underneath. Next you will need to fix the frame labeled DNS along the side of the left door using 8 screws. One has the window cut out and the other doesnt. US: # 1-888-374-4262Canada: # 1-800-661-6721UK: # 0121-5060008Other European Countries:# 31-1612-28301. 4 office tables and 12 office chairs assembled for one of our commercial Reading Handyman Services 2009 - 2020. Again check you have not lost the washer rings on the screws. Download a FREE QR-Code reader from your smartphone application site. The totalshed assembly time is around 4h for one person. Wall panels slide easily into the provided groove in wall panel O. Sometimes you may need to gently knock parts into place till they click. Lastly click the hinges labeled DX to the outside edge of both doors. ASSEMBLY INSTRUCTIONS | CONSIGNES DE MONTAGE | INSTRUCCIONES DE MONTAJE | MONTAGEANLEITUNG | MONTAGE-VOORSCHRIF TEN | ISTRUZIONI DASSEMBL AGGIO | INSTRUES DE MONTAGEM. Some parts have steel edges so be careful when handling components, Always wear work gloves, eye protection and long sleeves when assemblingor performing any maintenance on your shed. First insert the 2 steel slats into the resin shelf parts. You will now need 12 SC1 screws to fix the floor panels together. Place the first beam on the front wall of the shed. Therefore unless in a sheltered place, they will blow away in high winds if left empty so make sure you fill it up with some heavy objects if you dont want to find your shed in yourneighbours garden one day after a storm. Reading Handyman also assembles flatpack furniture, sheds, trampolines, play houses, sports equipment and more. There are 2 for each shelf, this will give them stability. Your shed parts are all in the 2 packages you have received. Do not attempt assembly on days with strong winds or low temperatures. The factor 8x6 shed is a storage solution that fits into any space. Your kit comes with the necessary window parts and at this stage you have already installed the wall panels with the window cut outs. Before unpacking your kit, it is recommended to use a clean work surface to spread the parts out and for pre-assembly. A property owner has already demolished his old shed and createda fairly flat base for this new shed. Also note while good torque electric screwdriver/power drill is not strictly required, its pretty much essential because you will have to drive a lot (~100) of various screws, many without pre-drilled holes Preparing them all now will prevent you from loosing the washers. All Rights Reserved. These items will ensure your assembly is smooth and easy, so be sure to check you have the right equipment before starting. Now we need to fix them to the shed walls carefully. First your DP Beams should be clicked on along the top and bottom of the door panels and the pegs labeled HG need to be added to the corners at the top and bottom. Before the roof goes on, you need to add the Skylight panel labeled BM. 1. Now for the roof finishing touches. Remember to Stop and Check your manual regularly so you know you are on the right track. Make sure to use your safety gloves, edges may be sharp. When hanging your doors make sure to click them in place at a 90 degree angle- so place the bottom joint in the hole and move to click the middle hinge in place against the wall and finish by standing it up straight. For the best experience on our site, be sure to turn on Javascript in your browser. Well get your shed assembled in no time. These Keter Apex sheds are only tested at wind speeds of up to 47mph. Screw all 12 RS pieces down. Next, place the windowpane gently into the frame. Read through all instructions before you begin and continue to refer to them during the entire assembly process. If you need help with shed & furniture assembly then contact your local handyman today. On the door to the left you will find a narrow slot in the edge by the handles. They can either be installed on the back wall of your shed or on either of the sidewalls. Then fix it from the inside with two CO screws. Side window can be installed on any side. Now we are going to assemble the doors. You will need 4 SC12 screws, 2 handles labeled GM, and two parts labeled GLL and GLR, which are both slightly different. In Step 4 you need to position a wall panel labeled O on one of the corners of the floor kit. In this particular case, the client wanted it to be on the right-hand side. If your base is not levelled you will not be able to interlock all the side panels properly. This Keter Apex 86 plastic shed was recently assembled by Reading Handyman in Caversham, Reading. Hope you enjoyed the project and if you have any questions please do not hesitate to visit CheapSheds.com.au. Repeat these steps for the second window. Grab the F-Out Window frame and slide it into place like so. Paving stones can be used instead of a solid concrete base. You will also find grooves in the floor for the wall to click into. Shelves can only be installed in the side walls and as you can see you have two options for your shelf. Walls are either labeled SPK or SP. If you are thinking of buying this shed then you should know a few things about it. These are marked MT2. Please prepare these components in advance at the beginning of each stage. Lastly screw the 4 corners of the roof from the inside. Fix the wall panel to the floor by screwing in the CO screws into the available holes. Argos Limited 2022. Lastly you will need to attach the side roof beams along the top of the left and right walls. Now, when unpacking and building your shed please be aware that. As you can see the roof has a slight overhang so to ensure it is securely fixed to the shed use 12 screws along each side but not the corners. To complete the Shed itself you need to simply screwing 2 SC12 screws to the bottom center left hand wall and the right, to secure the support beams in the center. Your shed comes with double doors so there should be parts for both. All Rights Reserved. This Factor 8x6 apex Resin & steel shed is ideal for storing garden tools, equipment, furniture and sundries, and using as a potting shed. You will also need 4 GSA shoulder washers. Before doing this make sure its facing the right way round and right side up. The first has the window cut out so before starting, its a good time to decide where you want your windows to go. The quality is surprisingly good, base interlocks together and its fairly easy to assemble. JavaScript seems to be disabled in your browser. Repeat for the door on the right however fix part GLR to the front with the handle. Before you start building your shed, make sure you have a nice level surface for your shed. You will also need an extra person to help build the shed. And click in the doorstoppers labeled DS. 20122022, manualsdir.comAll rights reserved. As you can see here. These just click into the available slots at the top and bottom of the left door. Click here to view the instruction manual. Make sure it is securely clicked onto the wall by pressing it gently into the grooves. Along the roof sheeting you will find 6 cut out sections. Next step is to set up the wall panels- you can use either wall panels labeled SP or SPK at this stage. We are now going to build the shell of the shed, by adding the walls. He stored all of his tools and equipmentin a popup gazebo next to it to keep them safe before the new shed arrives and is assembled. Now that your windows are complete we can move onto the Shelf- this too is very easy. You will need a stepladder to ensure you do this properly and safely. We recommend that sheds are sited on pre-laid, level, solid and dry ground, with a foundation of either a wooden shed base, concrete or paving to give a stable and even footing for your shed to sit on. Repeat process by fixing part DH2 on the right hand side door using 2 screws, the same way you did part DH1. The shed walls already provide a support lip around the edge so all you need to do it click parts SN to the middle beam, rest your shelf on the lip and secure them with a screw. Now slide in the 2 support beams either side of the skylight. Then add floor panels FS on either end to complete it. Set preferred store for Click + Collect and more. If you do decide to assemble it on your own there will be a point where you will need someoneshelp for 5 minutes just to hold the roof panels down whilst you secure them from the inside everything else can be done by one person. Now to put the finishing touches to the roof frame, all you need to do is click in place parts labeled DUC to the inner side beams in the center and click part CA to the back wall roof beam. You can either use a screwdriver or a powered drill to get the job done. This was an early morning Office furniture assembly in Central Reading. Next is to screw in the front and back beams to the roof sheeting underneath from the inside. Line up the 2 floor, panels labeled FG together and click them together. Next we are going to attach the door handles and security features. First you will need to attach door handle GILL to the left door using 2 screws and 2 GSA shoulder washers on the back.